This week we learned about making interfaces to display some input
Requirements
- Compare as many tool options as possible.
- Document your work on the group work page and reflect on your individual page what you learned.
Group Assignment
Individual Assignment
- Write an application for the embedded board that you made. that interfaces a user with an input and/or output device(s).
Softwares 💻
- Arduino IDE
- Processing
Group Assignment
Saeed started with a simple question for this group assignment he asked what is the difference between a dishwasher UI and an application UI. After some ponder he explained that Dishwasher UI Typically consists of buttons, etc.... They are designed for embedded systems with limited interactions. But an application UI is Software-based interface which has graphical user interfaces (GUIs) that supports varied workflows, customization, and user inputs.
To truly understand the difference I found this stackoverflow discussion especially around the difference between UIs and GUIs
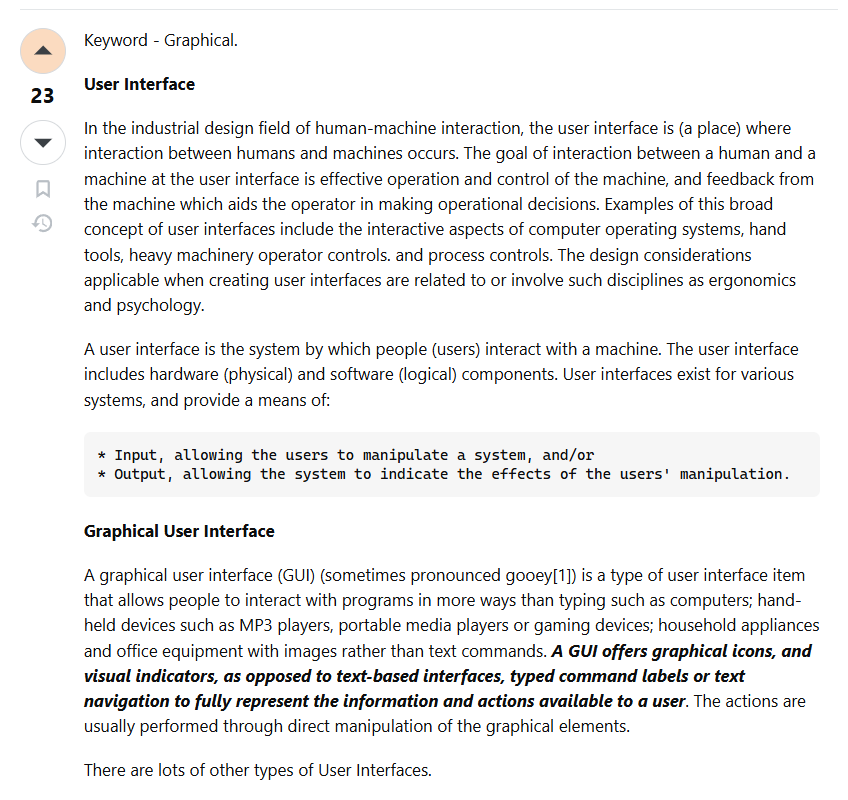
Image from stackoverflow by a user name Marko
first we learned the difference between what we can an I tested "Processing P3" which was my second time trying it out. I wanted to try out reading the button pressing action from my pcb board I made in Week 6 and display it on the serial of processing which will eventually lead to us to make a code that toggles LED number 13 on Arduino, and add a slider to show the readings of Analog a0 mapped from 0% to 100%.
First I found two good resources to start with:
then I went ahead and made a simple code that writes the "pressed" if it senses the button press and "Not Pressed". I wanted to expand further and make the button once pressed fill the rectangle but didn't have time and went on exploring ControlP5.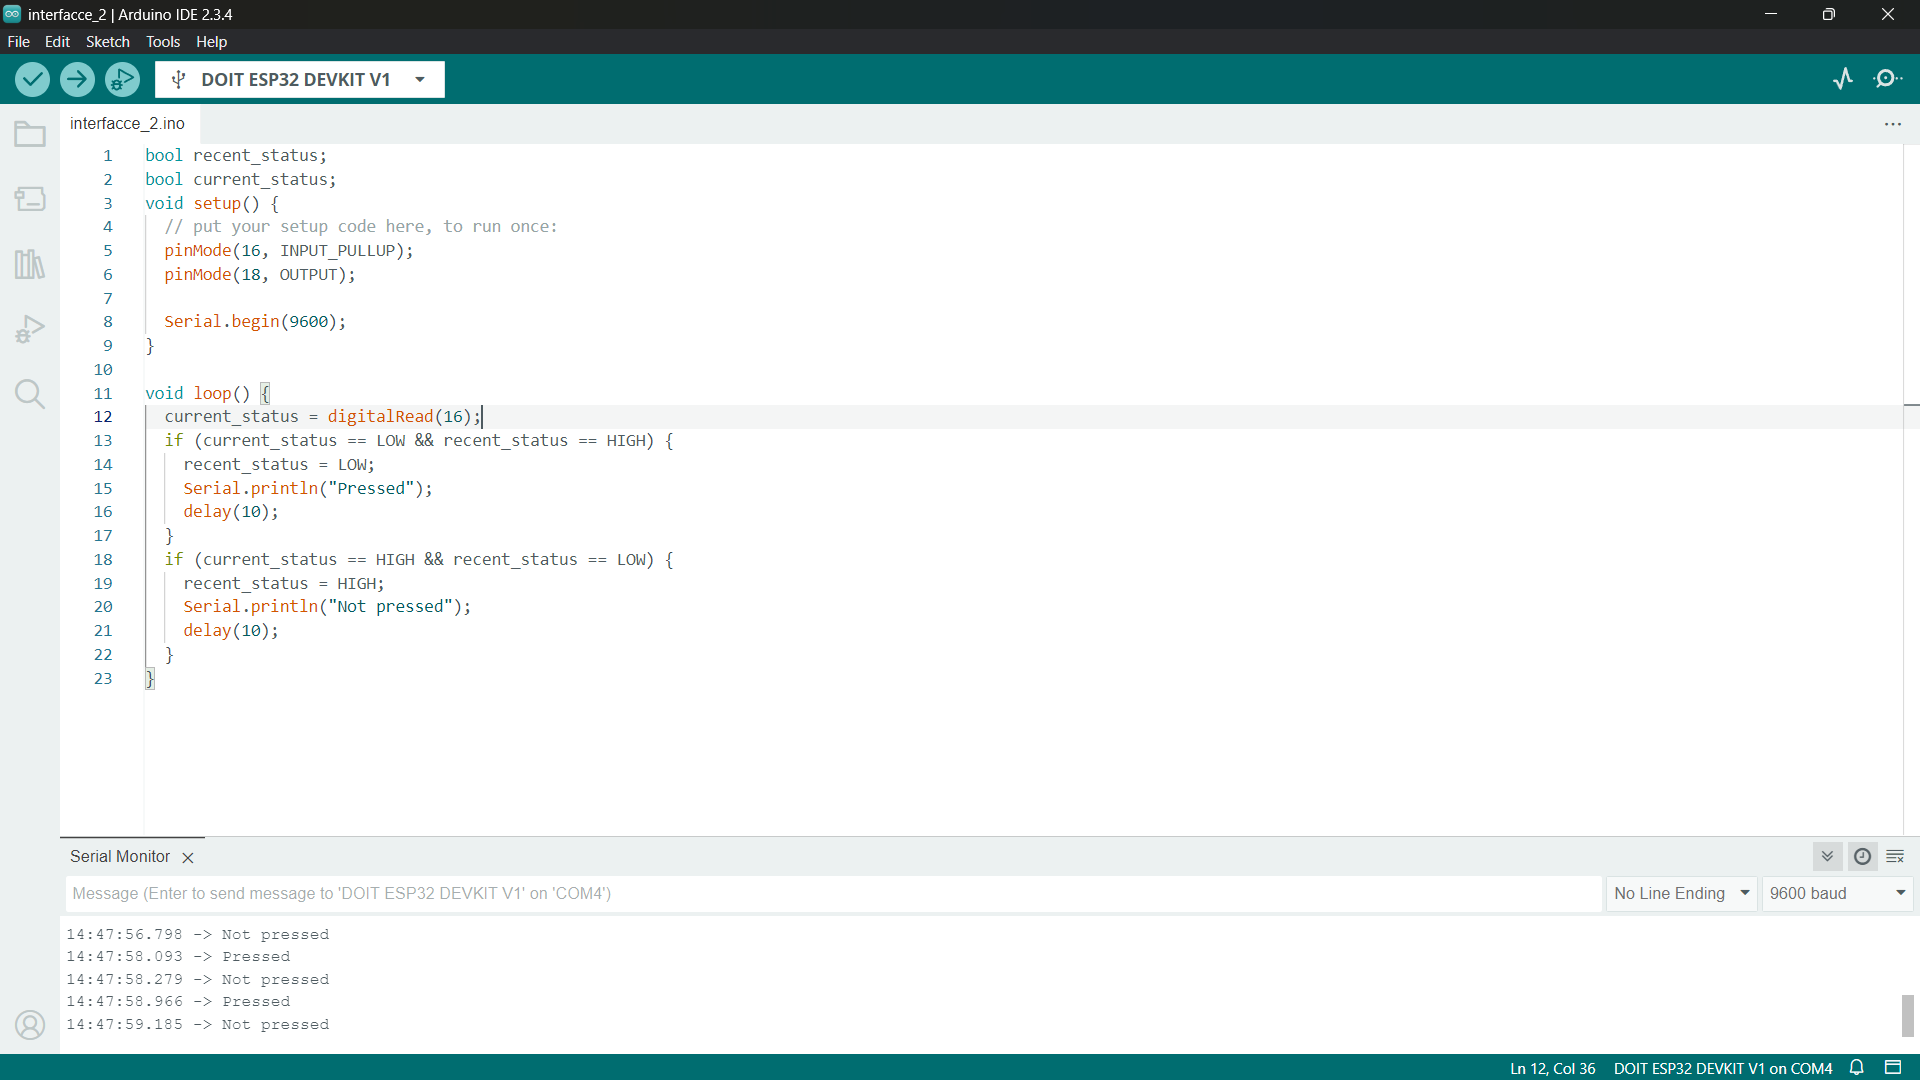
The Full Code!
 bool recent_status;
bool current_status;
void setup() {
  // put your setup code here, to run once:
  pinMode(16, INPUT_PULLUP);
  pinMode(18, OUTPUT);

  Serial.begin(9600);
}

void loop() {
  current_status = digitalRead(16);
  if (current_status == LOW && recent_status == HIGH) {
    recent_status = LOW;
    Serial.println("1");
    delay(10);
  }
  if (current_status == HIGH && recent_status == LOW) {
    recent_status = HIGH;
    Serial.println("2");
    delay(10);
  }
} import processing.serial.*;
Serial myPort;
int val;
color value = color(255, 255, 255);
String button_pressed = "Pressed";
void setup()
{
// On Windows machines, this generally opens COM1.
// Open whatever port is the one you're using.
size(500, 500);
String portName = Serial.list()[0];
myPort = new Serial(this, portName, 9600);
}
void draw() {
background(0);
if ( myPort.available() > 0)
{ // If data is available,
val = myPort.read(); // read it and store it in val
println(val); //print it out in the console
}
if (val == 1) {
fill(value);
rect(125, 125, 250, 250);
}
} We then explored the usage of Processing with an Arduino and a library called ControlP5, using it we can create sliders and really nice UIs. We used ChatGPT to create a code that programs the Arduino to do two things: When it receives the character 'T' over serial, it toggles an LED connected to pin 13 Every 100 ms, it reads from analog pin A0 and sends the raw value over serial
Meanwhile in Processing We made an interface with a button once pressed sends a 'T' over the Serial and a slider which reads real-time analog reading and maps it to percentage
See the resulting video in our Group AssignmentIndividual Assignment
Moving some ellipses with a Joystick
I wanted to use the joystick I used in Input devices week Since I tested their values and my objective is to make something light and fun. So I thought why not move some ellipses on the screen with Processing?
Wiring
I used the same wiring I used in Input devices week
Process
First I'll make the data reading from the Joystick printed over the serial and then Processing will get these reading and map the values of each X and Y axis as two separate spheres.
First I tried reading the reading from the joystick on Processing. I already did this in Input devices week so, I had inspiration from the code Last Minute Engineers. But unfortunately whrn I tried the exast same code on processing it was not really working properly.
Arduino Code
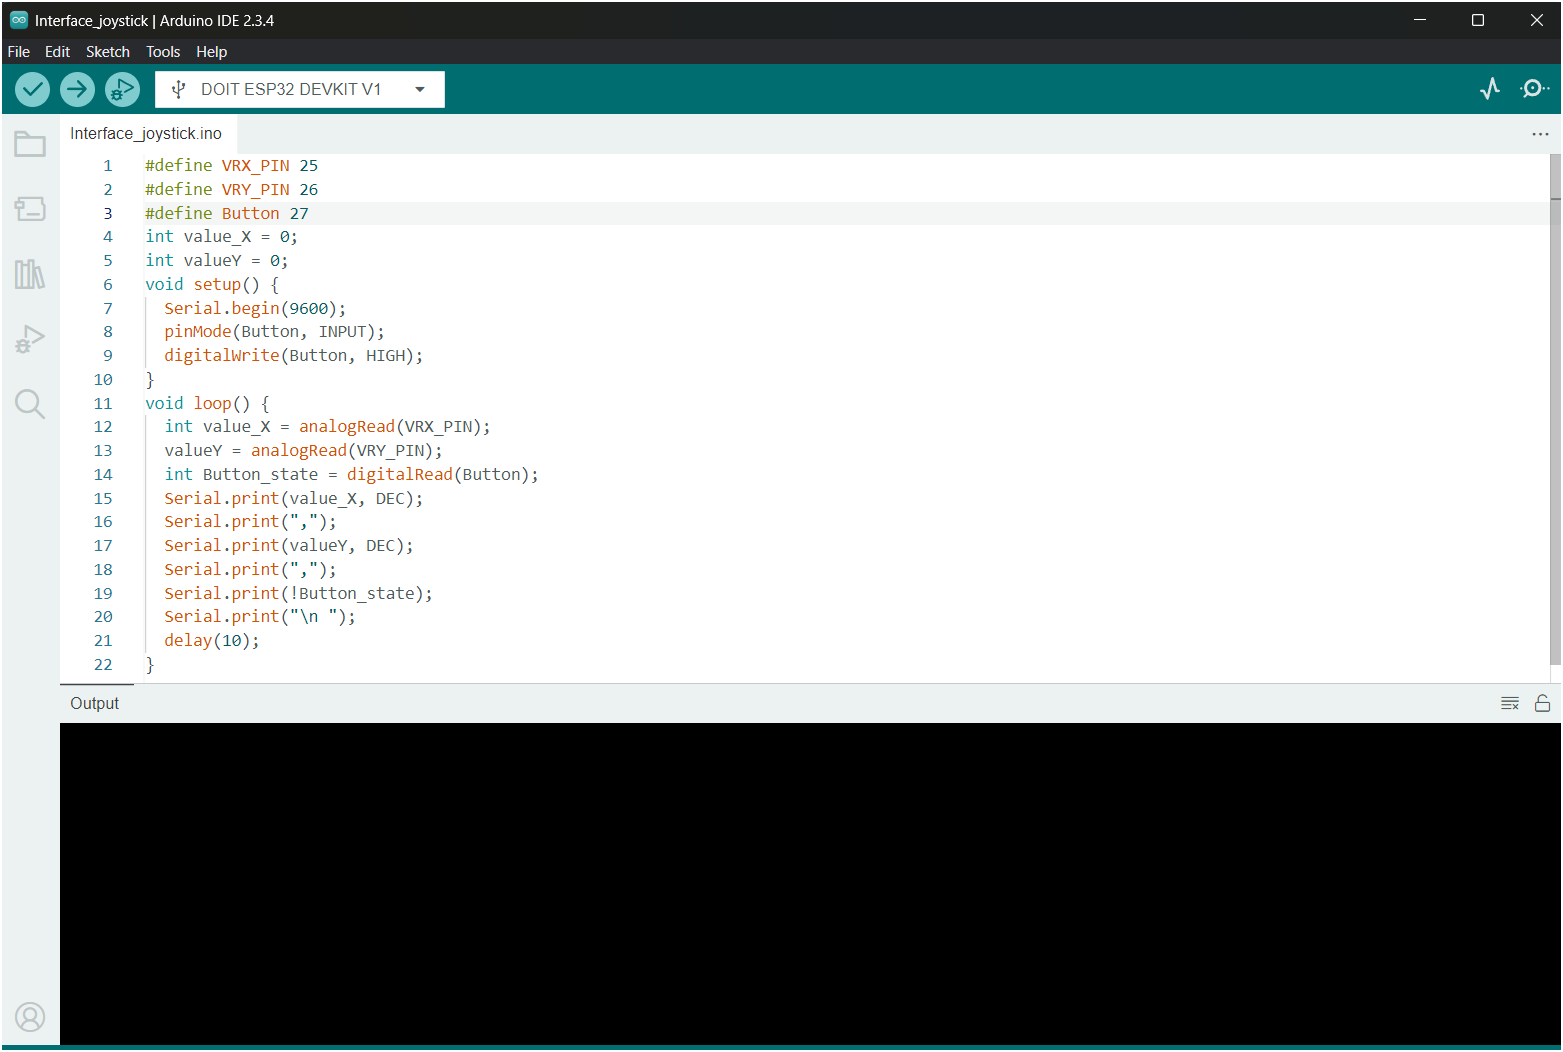
Arduino Code
#define VRX_PIN 25
#define VRY_PIN 26
#define Button 27
int value_X = 0;
int valueY = 0;
void setup() {
  Serial.begin(9600);
  pinMode(Button, INPUT);
  digitalWrite(Button, HIGH);
}
void loop() {
  int value_X = analogRead(VRX_PIN);
  valueY = analogRead(VRY_PIN);
  int Button_state = digitalRead(Button);
  Serial.print(value_X, DEC);
  Serial.print(",");
  Serial.print(valueY, DEC);
  Serial.print(",");
  Serial.print(!Button_state);
  Serial.print("\n ");
  delay(10);
}
Processing Code
import processing.serial.*;
Serial myPort;
int x;
int y;
int b;
String portName;
String val;
void setup() {
  myPort = new Serial(this, Serial.list()[0], 9600);
  myPort.bufferUntil('\n');
}
void draw() {
  println(x);
  println(y);
}
void serialEvent(Serial myPort) {
  val = myPort.readStringUntil('\n');    // read the data until the newline n appears
  if (val != null) {
    val = trim(val);
    int[] vals = int(splitTokens(val, ","));
    x = vals[0];
    y = vals[1];
    b = vals[2];
  }
}
Serial myPort; Declare a serial port variable
int x; Declare a variable to hold the x-axis reading
int y; Declare a variable to hold the y-axis reading
int b; Declare a variable to hold the button reading
String portName; Declare a variable to hold the port name
String val; Declare a variable to hold the value read from the serial port
In the void setup() we initialize the serial port with the first available port and a baud rate of
9600.
myPort = new Serial(this, Serial.list()[0], 9600);
We also set the buffer to read until a newline character is encountered.
myPort.bufferUntil('\n');
In the void draw() we print the x and y values to the console.
println(x);
println(y);
In the void loop() we check the connection and retrieve the data. Note we sent a request every 5 seconds
In the SerialEvent Function it reads the string from serial until newline
val = trim(val); it removes whitespace (like \r, \n)
int[] vals = int(splitTokens(val, ",")); Split the string by commas and convert to integers
Then restore the values in the x, y, and b variables
x = vals[0];
y = vals[1];
void serialEvent(Serial myPort) {
  val = myPort.readStringUntil('\n');    // read the data until the newline n appears
  if (val != null) {
    val = trim(val);
    int[] vals = int(splitTokens(val, ","));
    x = vals[0];
    y = vals[1];
    b = vals[2];
  }
}
Here's a video showcasing the values printed on Processing.
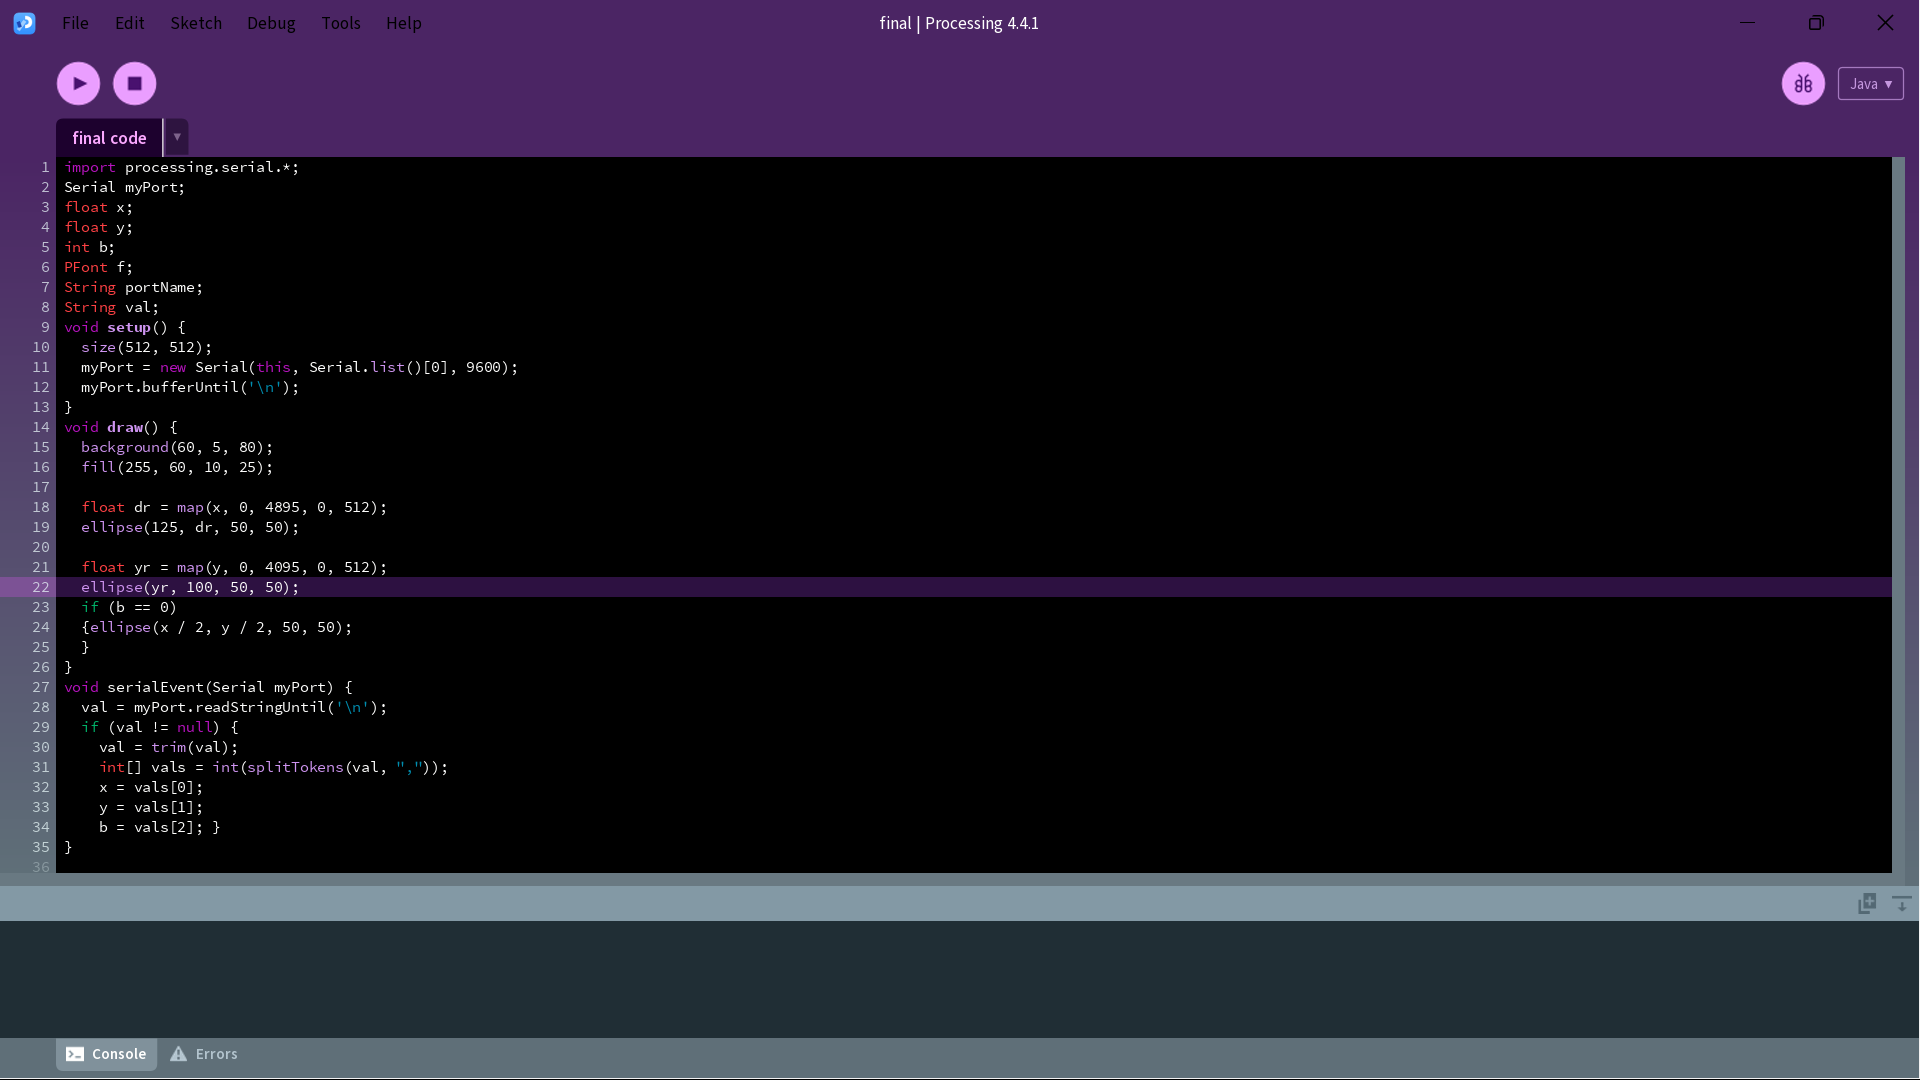
Final Output
After reading the data the only missing part is the mapping so I made mapped the values to their position
in void draw()
and
one ellipse will go up and down and the other left and right. Imade their colour to be this reddish colour
and
changed the background to purple.
       background(60, 5, 80);
  fill(255, 60, 10, 25);

  float dr = map(x, 0, 4895, 0, 512);
  ellipse(125, dr, 50, 50);

  float yr = map(y, 0, 4095, 0, 512);
  ellipse(yr, 100, 50, 50);
  if (b == 0)
  {ellipse(x / 2, y / 2, 50, 50);
  }
import processing.serial.*;
Serial myPort;
int x;
int y;
int b;
String portName;
String val;
void setup() {
  myPort = new Serial(this, Serial.list()[0], 9600);
  myPort.bufferUntil('\n');
}
void draw() {
 background(60, 5, 80);
  fill(255, 60, 10, 25);

  float dr = map(x, 0, 4895, 0, 512);
  ellipse(125, dr, 50, 50);

  float yr = map(y, 0, 4095, 0, 512);
  ellipse(yr, 100, 50, 50);
  if (b == 0)
  {ellipse(x / 2, y / 2, 50, 50);
  }
}
void serialEvent(Serial myPort) {
  val = myPort.readStringUntil('\n');    // read the data until the newline n appears
  if (val != null) {
    val = trim(val);
    int[] vals = int(splitTokens(val, ","));
    x = vals[0];
    y = vals[1];
    b = vals[2];
  }
}
Challenges
First the processing would be one minute reading the serial ok and then when I try again it will stop. But my biggest challenge was time and I wanted to make a planet-like simulation that's controlled with the joystick but next time.